How to Insulate Your Attic Door/Hatch

Enjoy reading the latest DIY articles and saving money?
Receive our latest helpful hints, tricks and savings, directly to your inbox.
Posted June 1, 2017
Now that all the Christmas and holiday decorations are put away, you may have noticed that your attic needs a little reboot in the air leak department. Especially with it being winter and all, addressing the lack of insulation around your attic hatch is a simple home upgrade for the new year that will save you energy and money year round. Treat your attic door as if it was a door leading to the outdoors. Learn more below about how to insulate your attic door.
Before You Start
If you haven’t inspected your attic insulation in a while, learn how to inspect and seal your attic before moving on to your attic hatch. While you are up there, learn how to inspect and seal air duct leaks.
Your attic door/hatch may appear to be fine because the heat escaping isn’t visible. In the winter, cold air will enter and warm air will escape. In the summer, conditioned air will escape through any air leaks in your home, including the ones in your attic.
Due to the way homes are constructed, it’s very likely air leaks are happening through your attic as well. Keep out that winter air with proper attic insulation and air sealing.
Effects of Air Leaks
The colder it is outside, the more you are going to notice when the outside air is creeping in. The diagram below labels the biggest culprits of air leaks within the home. This blog focuses on area B, the attic hatch.

Source: energystar.gov
- A. Behind Kneewalls
- B. Attic Hatch
- C. Wiring Holes
- D. Plumbing Vent
- E. Open Soffit (the box that hides recessed lights)
- F. Recessed Light
- G. Furnace Flue or Duct Chaseways (the hollow box or wall feature that hides ducts)
- H. Basement Rim Joists (where the foundation meets the wood framing)
- I. Windows and Doors
Materials Needed for Sealing Attic Door/Hatch
- Fiberglass insulation/or rigid foam board insulation (cut to size)
- Self-adhesive weatherstripping
- Stapler, nails or screws
What to do:
The self-sticking weatherstripping that you choose depends on how large the gap is that you wish to fill.
1. Check for air leaks and wood stops
There are different ways to accomplish this. You can check for air leaks with a lit incense stick or a thin piece of toilet paper. If there are indications of erratic air movement coming from your attic hatch, replacement weatherstripping is necessary.
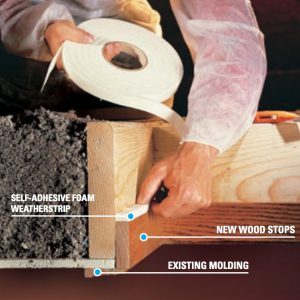
You can also inspect the weatherstripping and molding around your attic door to see if it is damaged. If the attic hatch rests on the molding, you should add 2 1/2 inch stops around the entire opening. These new wood stops provide a larger area for attaching new weatherstripping. They also give you an easy area to add hook fasteners if needed. The door/hatch should close all the way, pressing down on the gasket to create a full seal.
2. Inspect the weatherstripping/gaskets around the attic hatch opening
If they seem dried out or damaged, remove them before replacing them. Usually, you can just pull them away from the frame. If the weatherstripping was fastened with nails or screws, more time will be needed to remove all of the fasteners.
3. Install new weatherstripping
After removing the old weatherstripping or if there was none to begin with, you’re ready to install new weatherstripping. Measure and cut along the bottom edge of the trim and around the other three edges until fits snug on all four sides. Make sure you purchase self-adhesive weatherstripping.
Again, if you need to add new wood stops, do this before applying new weatherstripping. You will be adding the self-adhesive foam weatherstripping to the top edges of the new wood stops.
Source: ENERGY STAR
4. Add fiberglass or rigid foam board to back of hatch
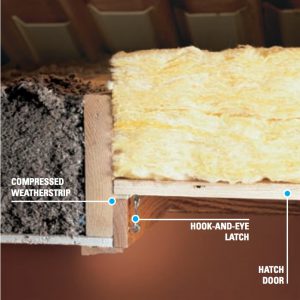
After you have replaced the weatherstripping, you’ll want to cut a piece of fiberglass or rigid foam board to size and nail or glue it on the back of the hatch/door. You can purchase pre-cut attic door insulation material at your local home improvement store or online.
5. Attach hook-and-eye fasteners
Once you have added new weatherstripping and cut a piece of insulation for the back of the door, you will want to complete this project with a hook-and-eye fastener that compresses when you latch the hook.
Source: ENERGY STAR
Double check that there is a full seal by taking a lit incense stick and holding it around the perimeter of your attic door.
For visual aid on how to complete this project, check out this video:
If you have any questions about insulating and air sealing your attic, don’t hesitate to contact Hiller. We’re available 24/7.